Sunday 8 February 2015

Layering Combinations


Spring will come soon but it’s still not so warm as we want. So at this time of the year we like to wear several jackets or combine jackets or shirts with a coat. And no doubt that’s why you always think how to combine many parts of clothes at same time and not to look ridiculous. We want to share with you some good outfits, just look at these pics. Don’t be afraid to choose baggy trousers and add them to a long coat. Also pay your attention to oversized scarves, they look fantastic with jackets. Be stylish and find your best look!


Flawess Skin


Dark Circles

Choose a yellow-toned concealer that is one to two shades lighter than your foundation. For extremely dark circles (circles that have a greenish or purplish tinge to them), start with a pink- or peach-toned concealer, then layer on the yellow-toned concealer. Pass on concealer that's too light, is too pink or white, or is chalky or greasy. Never use concealer to cover blemishes. Concealer is designed to be lighter than your skin tone, so it will actually draw attention to your blemish. And skip concealer on eyelids because it will make eye makeup crease.
Always prep skin with eye cream to create a smooth canvas for concealer. Use a small headed brush with firm bristles to apply a generous amount of concealer under the eye, along the lashline and innermost corner of the eye. Gently tap the concealer with the pad of your index finger to blend it in. Try to apply as little pressure as possible. Tugging and rubbing will simply wipe concealer off. If you still see darkness, apply a second layer of concealer.
To avoid mid-day creasing, lock the concealer in place with loose powder. Use a velour puff or small powder brush to apply the powder. For the most natural look, use white powder if you have fair skin and yellow-toned powder if you have light, medium or dark skin.
    
 
Acne

A creamy, medium-weight cover-up or stick foundation is the best way to cover a blemish. Liquid formulas will be too sheer and won't offer enough coverage. Choose a shade that's the same color as your skin. To check, swipe the cover-up or stick foundation on the side of your face. If the swipe disappears into your skin, it's the right shade.
Use a concealer brush to spot-apply the cover-up or stick foundation just on the blemish. Pat with your index finger to blend. Then, set the cover-up or stick foundation with face powder applied with a velour puff or small powder brush. If you still see the blemish, repeat this process, layering cover-up or stick foundation and powder.


How to get flawless skin

Foundation is the best way to make skin look smooth and even. Over the years working as a makeup artist, I've found that yellow-toned foundation looks the most natural on all skin tones. To find your perfect match, swatch a few shades on the side of your face and check your reflection in natural light. The shade that disappears is the right one. If you have to apply foundation on your neck to make it match your face, you're using the wrong shade. It's a good idea to have two shades of foundation — one for the winter months and a slightly darker one for the summer when skin color tends to warm up.
Foundation formulas range from low-maintenance tinted moisturizers to moisturizing liquid cream foundations with more coverage. Here's a look at what the different formulas have to offer:
  • Tinted moisturizers and tinted balms combine the benefits of a face cream with the skin-evening properties of a foundation. They're a good choice for normal and normal to dry skin that needs minimal coverage.
  • Liquid and cream foundations are available in both moisturizing and oil-free formulas. They are easy to blend and can go from medium to full-coverage depending on how much you apply. If you go for liquid, be sure to shake the bottle first to make sure heavier parts haven't settled to the bottom.
  • Stick foundation is one of my favorite formulas because it's portable and quick and easy to apply. A good choice for normal skin, this travel-friendly formula won't ever spill and it can also be used to cover blemishes and scars.
  • Compact foundation, with its cream to powder formulation, is best for oily skin. To avoid looking cakey, look for one that's not too powdery. Many compacts come with different sponges that allow you to control the amount of coverage you get.
Use your fingers or a makeup sponge to spot-apply foundation where skin needs to be evened out, especially around the nose and mouth where there's redness. For full, all-over coverage, use a foundation brush to apply and blend foundation. To give foundation staying power and take away shine, finish off with a dusting of powder.
As for powder, pale yellow-toned powder is the most flattering on all skin tones. A big beauty myth is that translucent powder is invisible. I find that it actually makes skin look pasty and ashy. The same holds for purple, pink or green powders designed to “correct” color — they don't look natural, so stay away from them. Look for a powder with a silky, lighter-than-air texture. I use loose powder at home and pressed powder when I travel, since it's more portable. Use a velour puff to apply the powder and dust off any excess with a powder brush. Apply a fair amount of powder if skin is oily. Dust it just around the nose and forehead if skin is dry.

How to get a healthy glow

I've always loved the healthy, outdoorsy look. When everyone was doing neon-bright makeup in the ’80s and early ’90s, I was into creating natural-looking faces that featured bronzed skin and flushed cheeks. It's still my favorite look today.
Whenever I feel blah, I always reach for bronzer or self-tanner. It's the perfect antidote to sallow-looking skin. Bronzer comes in a handful of formulas: powder, cream (stick or compact), or gel. I prefer bronzing powder because it's quick and mistake-proof. Use a short, fluffy brush to apply bronzer where the sun naturally hits your face — your forehead, cheeks, nose, and chin. Be sure to dust your neck and chest if you're wearing a bare top. For a dewy look, try a cream formula. Gel formulas give you a sheer, stained look and are good for oily skins. Use your fingers or a sponge to apply cream and gel bronzers the same way as the powder formula.
The most natural-looking bronzers have predominantly brown tones (with a bit of red) to them. Avoid bronzers that are orange-toned or frosted because they look artificial on any complexion. Most companies offer light, medium, and dark shades. Pick your shade based on how you tan naturally. For example, if you turn a medium golden brown in the sun, a medium bronzer is your best bet. The bronzer should blend easily and warm up your face. If the color looks too orange or obvious, try one shade lighter.
For a sun-kissed look that lasts a few days, try self-tanner. Before slathering yourself in self-tanner, do a patch test on the inside of your arm to make sure you're not allergic to the formula. To ensure that color develops evenly, be sure to exfoliate any rough patches before you apply the tanner. When applying self-tanner to your face, spread a thin layer to start. If you want to go darker, you can always wait until the color develops and do another application. Avoid your eyes and make sure to get your ears and neck so that there aren't any obvious lines. Be sure to wash your hands thoroughly after applying self-tanner, and allow enough time for it to absorb before getting dressed or going to bed.
If you wake up the next day to mistakes like too dark color or obvious streaks, you can fade them with a gentle exfoliant and lots of moisturizer.

Long Hair styles on wedding


I hope you find a look that inspires you to be beaut-HAIR-ful on your Big day!

1. Curled and Intertwined.

Wedding-hair-down-do-inspiration-curled-intertwined

2. Curly ends with side bangs.

Wedding-hair-down-do-inspiration-curls-with-bangs

3. Curly Waterfall.

Wedding-hair-down-do-inspiration-curly-waterfall

4. Neat Side swept fishtail braid

Wedding-hair-down-do-inspiration-fishtail-side-swept-neat

5. Side swept Fishtail braid with Head cap.

Wedding-hair-down-do-inspiration-fishtail-with-bridal-head-cap

6. Half up, Half down with full drop curls.

Wedding-hair-down-do-inspiration-half-up-half-full-curls

7. Very loose waves with head wrap.

Wedding-hair-down-do-inspiration-loose-waves-head-wrap

8. Messy fishtail braid to the side with bangs.

Wedding-hair-down-do-inspiration-messy-side-swept-fishtail

9. Single one sided loose braid.

Wedding-hair-down-do-inspiration-one-side-braids

10. Loose drop waves, clipped to one side.

Wedding-hair-down-do-inspiration-side-swept-hair-down

11. Simply Wavy

Wedding-hair-down-do-inspiration-simply-wavy

12. Braids on each side with drop curls.

Wedding-hair-down-do-inspiration-braids-on-two-sides

Eye Makeup -Valentine’s Day Special “Pink Love”


Valentines day Eye Makeup Look Tutorial - Pink Love

Steps to achieve the look:

  1. Conceal under eyes and use a white creamy base on the upper lid for a bright pink effect
  2. Blend it out with fingers
  3. Now pat a Reddish-Pink Eye shadow all over the lids, bealow the crease line
  4. Put a dark Shimmery pink eye shadow on the outer V corner for some added intensity
  5. Blend out all the harsh lines using a soft, fluffy blending brush
  6. Using a wet angled liner brush apply the same reddish-Pink on lower lash line.
  7. Using a shimmery peachy-white highlighter on inner corners
  8. Line the waterline with black Kohl
  9. Apply a Matte black liner on the upper lash line with a slight wing.
  10. Draw a tiny heart just below the outer-V Corner with a smudge proof Black Pencil. You can stop here as the next Two steps are just for a Glam touch… image: http://beautyandmakeupmatters.com/BMM/wp-includes/images/smilies/icon_wink.gif
    ;)
  11. Use tiny studs, I used “Bindis” in baby pink and places them on my brow bone, just after the arch
  12. Using a damp flat shader brush apply some shimmery pigment all over the lids, preferably some light shade and finish off with Volumizing mascara.

Valentines Day Inspired Eye Makeup Look - Pink Love

Products Used

  1. INGLOT Freedom System Eye Shadow Matte #382
  2. INGLOT Freedom System Eye Shadow Pearl #450
  3. MAC Pigment – Reflects Teal 
  4. Bourjois Kohl & Contour Eye Pencil – Noir Black
  5. L’Oreal 24Hr Super Liner Gel Eye Liner – Black
  6. Revlon Custom Eyes: Naturally Glamorous

Valentines day Eye Makeup Look - Pink Love


Valentine Make up ideas

makeup tutorials - photo by nbarrett photography - http://ruffledblog.com/valentines-day-makeup
Makeup Essentials #1

1. Moisturizer: Clinique Moisture Surge
2. Cream Foundation: MAC Studio Fix Fluid
3. Primer: MAC Prep + Prime Natural Radiance
4. Flat foundation brush
5. Concealer: Hard Candy Glamoflauge

FACE
1.Start by moisturizing fresh clean skin with a light-weight, oil-free, gel-based moisturizer like Moisture Surge by Clinque.
makeup tutorials - photo by nbarrett photography - http://ruffledblog.com/valentines-day-makeup
2. Using your fingers, apply a small pump of MAC Prep + Prime Natural Radiance primer all over the face, including eyelids.
3. With a flat foundation brush, apply a full coverage cream foundation, like MAC Studio Fix Fluid for a pretty, glowing complexion.
makeup tutorials - photo by nbarrett photography - http://ruffledblog.com/valentines-day-makeup
4. Using a smaller foundation brush, apply a concealer, like Hard Candy Glamoflauge, that is two shades lighter than your foundation to conceal and brighten the under eye area. Push the concealer all the way up against the bottom lash line, from the outer corner of the eye, down to a point under the eye and back up to the inner corner of the eye, creating a triangle. Use your finger to gently pat the product in place and blend.
wedding makeup tutorials - photo by nbarrett photography - http://ruffledblog.com/valentines-day-makeup
5. With a medium-sized blush brush, use a brightly colored cream blush like Revlon Photo Ready in a swirling motion on the apples of the cheeks, blending upward toward the temple.
wedding makeup tutorials - photo by nbarrett photography - http://ruffledblog.com/valentines-day-makeup
6. For longer lasting results, set the face using a large powder brush with a lightweight finishing powder like MAC Mineralize Skinfinish.
makeup tutorials - photo by nbarrett photography - http://ruffledblog.com/valentines-day-makeup
Makeup Essentials #2

1. Cream Eyeshadow: Bobbi Brown Long Wear Cream Shadow Stick in Golden Pink
2. Mascara: PUR Big Blink in black
3. Matte Lip Stain: Revlon Colorburst Matte Balm in Elusive
4. Lip Liner: Palladio Herbal Lip Liner in Raspberry
5. Cream Blush: Revlon Photo Ready Cream Blush in Flushed

EYES
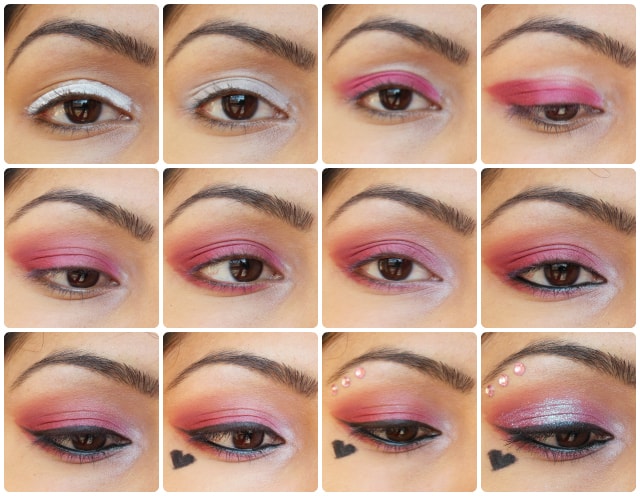
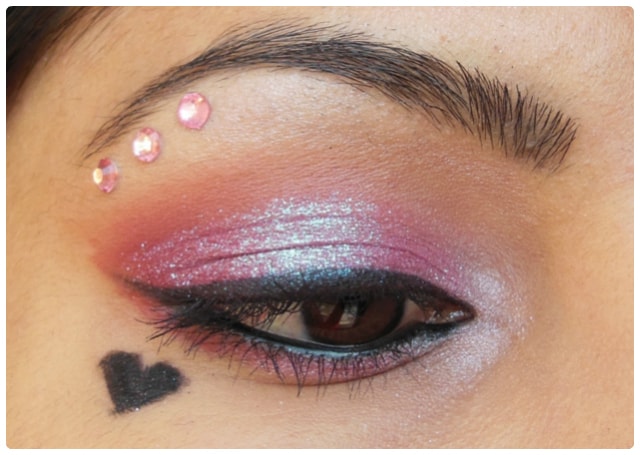
1. Select a light, rose-gold, shimmer cream shadow, like Bobbi Brown Long Wear Cream Shadow Stick in Golden Pink and apply it directly to the eyelid from lash line to crease. Use your finger to blend if necessary.
wedding makeup tutorials - photo by nbarrett photography - http://ruffledblog.com/valentines-day-makeup
2. Apply one coat of glossy black mascara like PUR Big Blink in black, for long, defined lashes.
wedding makeup tutorials - photo by nbarrett photography - http://ruffledblog.com/valentines-day-makeup
LIPS
1. Choose a rosey, matte lipcolor, such as Revlon Colorburst Matte Balm in Elusive, for a soft but playfully feminine finish.
wedding makeup tutorials - photo by nbarrett photography - http://ruffledblog.com/valentines-day-makeup

wedding beauty tutorials - photo by nbarrett photography - http://ruffledblog.com/valentines-day-makeup

Valentine’s Look #2: Vixen

bridal makeup tutorials - photo by nbarrett photography - http://ruffledblog.com/valentines-day-makeup


FACE
1. Follow “Face” steps number one through five above, adding a hint of bronzer under the cheekbones for a more sculpted look.
2. With your fingers, apply a dab of liquid, light-reflecting highlighter, such as Revlon PhotoReady Skinlights Face Illuminator just above the cheekbones for a natural glow.
makeup tutorials - photo by nbarrett photography - http://ruffledblog.com/valentines-day-makeup
Makeup Essentials #3

1. Brow Enhancer: Makeup Forever Aqua Brow
2. Lipstick: MAC Satin Lipstick in Myth
3. Lip Gloss: NYX Aqua Luxe Lipgloss in Beat Goes On
4. Eyeshadow: MAC Luster Shadow in Coppery
5. Mascara: NYX Faux Lashes in Black
6. Eye Liner: NYX Long Pencil Liner in Black

EYES
1. Select a bold, vibrant powder shadow, such as MAC Luster Shadow in Coppery, and swipe it over the eyelid using a medium sized shadow brush, from lash line to just above the crease, blending outwards toward the corner of the eye.
makeup tutorials - photo by nbarrett photography - http://ruffledblog.com/valentines-day-makeup
2. Using a stiff, flat shadow brush, take the same colored shadow and push it right along the bottom lash line, connecting the color in the outer corner with the top shadow. Smudge just underneath the bottom lash line with your finger to blend.
3. With a black eye pencil, line the top lash line. For a darker, more dramatic line, warm up the pencil by swiping it on the top of your hand first.
makeup tutorials - photo by nbarrett photography - http://ruffledblog.com/valentines-day-makeup
4. Apply 2-3 coats of volumizing black mascara, like NYX Faux Lashes to the top and bottom lashes.
5. Using a thin brush, apply a tiny bit of brow tint (such as Makeup Forever Aqua Brow) to the eyebrows, filling in any holes, and brush them out with an eyebrow spool for defined but natural brows.
LIPS
1. Line the lips with a muted, natural cream pencil lip liner.
2. Using a lip brush, fill in the lips with a pink-based nude satin lipstick, like MAC Satin Lipstick in Myth.
wedding makeup tutorials - photo by nbarrett photography - http://ruffledblog.com/valentines-day-makeup
3. Finish off with a swipe of nude shimmer lipgloss such as NYX Aqua Luxe Lipgloss in Beat Goes On, right in the center of the bottom lip. Press your lips together to spread the gloss.